Clothing & Jewelry
Handsew Your Own Warm Wool Blanket Coat
Course Overview
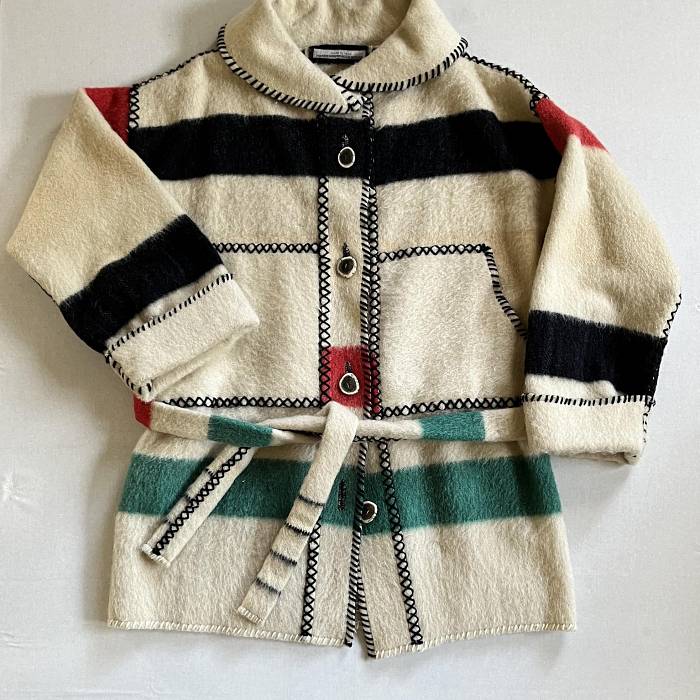
You will craft a cozy outdoor garment perfect for our fluctuating northern climate. This blanket coat pattern is unique to North House and has been part of the history of the school since the early years. In this workshop, each student gains patterning and handsewing skills needed to craft their unique blanket coat. Students bring their own chosen plain, patterned, or striped blanket. Starting with either a new or recycled wool blanket, we first adjust a personal pattern, then we move step by step to cut the blanket, practice functional and decorative hand stitches, and then the coat is handsewn together, which takes time. Students will leave with a good start on the handwork and will finish at home by the fireside! Please contact the instructor after you register to receive guidelines for choosing your pattern size and finding your unique new or recycled blanket.
Students will also learn the background of historical blanket coats, which have been used for over 200 years across the northern areas of North America. Some historic coats were cut with very simple square pieces, and some were complex tailored variations. The coats stem in origin from the capote, hooded blanket coats used in the seventeenth and eighteenth centuries. In North America, blanket coats were made by both Indigenous and European traders during the years of trading beaver furs for manufactured blankets. Eventually, blanket coats in a variety of styles were adopted by both men and women in Canadian and American cities as warm winter fashion. Regionally, around the 1880s in Montreal, Quebec, and St. Paul, Minnesota, the emblematic Hudson’s Bay style blanket coats became popular as colorful fashion for winter events. By the early twentieth century, the Hudson’s Bay style blanket coat became a familiar symbol promoting Glacier National Park. Currently the colorful striped wool blankets are a popular and functional fabric for warm garments and accessories.
Blanket coats with a front button closure can be a variety of lengths which might be hooded, belted, or feature a wind breaking collar and pockets. Today, blanket coats are used for outdoor activities such as winter hiking, snowshoeing, or relaxing around the fire. The coat we will make in this class is based on a unique pattern developed in the early years of North House Folk School. It can be made from any type of new or recycled wool blanket, whether plain colored or the classic striped Hudson’s Bay style blanket. Plan to bring a new or recycled wool blanket of your choice. There are four sizes of blanket coat patterns available in class. These are generously cut for a loose fit allowing for layering of winter garments. The patterns can generally be cut from these size blankets: extra small, small, medium patterns fit on a Twin Size Blanket; large, extra large patterns fit on a Full Size Blanket. Other and all size options are welcome. Please contact the instructor with pattern or size questions. When you register for the class, contact the instructor and you will receive more information about choosing your pattern and blanket sizes.
Required Tools
Note - Bring your favorite tools for handsewing – it is important to have tools that you are most comfortable using. Assemble your tools in a sewing tool box. If you cannot find some of the tools listed don’t worry – there will be some extra tools provided in the classroom for students to share.
- Sewing machine – If you own a portable sewing machine, bring it to class.While blanket coats are handsewn together, the sewing machines might be used for some temporary basting, repairs, and size samples. Please test your machine before coming to class to know that it is in working order. Bring a spool of thread to match your blanket, and bobbins to fit your machine. If you do not own a sewing machine that you can bring, North House has a few machines. You will be welcome to use them and will be given basic instruction for their use. Please email info@northhouse.org at least three weeks prior to class to request use of a sewing machine.
- Regular hand sewing needles used for sewing with thread
- Tapestry needles and Chenille needles for sewing with yarn (both come in assorted packages of sizes 18 - 22) (Both types of needles have large eyes for
- sewing with yarn. Chenille needles have sharp points, Tapestry needles have
- dull points.)
- Needle threaders – two sizes, 1) for sewing with yarn and 2) for sewing with
- thread
- Thimble (some like leather thimbles, or metal thimbles sized to fit your finger)
- Pins (longer pins with plastic heads are very handy for thick fabrics)
- Pin cushion or magnet
- See-Thru Clear Plastic Ruler (Hancock’s Fabrics has the Quilter’s See-Thru Drafting Ruler 18” x 2” for about $8.00; or bring any smaller or larger clear plastic rulers)
- Flexible measuring tape
- Fabric marking pencil
- Lead pencil, eraser, sharpener
- Paper cutting scissors
- Fabric cutting scissors – sharp and sturdy for cutting blankets (If you prefer using a rotary cutter instead of a scissors, please bring a cutting mat)
- Small thread cutting scissors
- Seam ripper
- Sewing awl (sometimes called a tailor’s awl – not a leather stitching lock-stich awl)
- Small pliers or needle puller
- Spool thread - White all-purpose machine sewing thread and thread to match your blanket
Optional Tools
Tools and supplies instructor will bring these to share in the classroom. If it is convenient for you to bring any of these items, you can also bring your own.
- Sleeve board (for ironing sleeves)
- Tailor’s ham and Seam pressing board or roll
- Travel Iron/travel press board
- Press cloth
- Hand-held steamer
- Needle point marking wheels for marking pattern lines
- Fabric carbon paper mounted on foam core boards
- Handy variety of tapes – Tiger tape marked in 1/2 inch and smaller intervals, 3M surgical tape, Scotch Magic tape, Wash-away tape, etc.
- Third Hand Clamp (Lacis brand)


